
Score Study Methods for Aspiring Conductors
Learn the systematic score study methods that professional conductors use — including the hourglass method, seven trips through the score, and color-coded marking systems — so you can prepare any orchestral work with confidence.
Updated:
The first shock of an orchestral score is not that it is difficult. It is that it gives you too many reasonable things to do at once. You could listen to a recording. You could mark every dynamic. You could analyze the harmony. You could learn the transpositions, circle percussion changes, sing the bass line, memorize cues, or stand up and practice the beat pattern. All of those tasks belong somewhere in a conductor’s study routine, but not all at the same moment.
The useful first distinction is between score study and score preparation. Kenneth Woods separates these as different kinds of work: study is the conductor’s attempt to understand the piece holistically—its form, harmony, narrative, historical setting, and expressive logic—while preparation is the practical work that makes the score usable in rehearsal, including cues, dynamics, tempo changes, cutoffs, and other markings.[1] Confusing those two modes is one reason beginners can spend an hour with a score and leave with only a few anxious pencil marks.
Score study asks, “What is this piece doing?” Score preparation asks, “What will I need to show, hear, cue, fix, or decide in front of players?” A conductor eventually needs both, but the order matters. If the first hour is only practical marking, the page becomes busy before it becomes meaningful. If the first hour is only abstract analysis, the conductor may understand the sonata outline and still miss the clarinet entrance that needs a breath and a glance.
Start Wide, Then Go Narrow, Then Return to the Whole
A reliable way to organize the work is the hourglass method: begin with large-scale awareness, move into detailed investigation, and then return to an integrated vision of the whole piece. ConductIT presents this as a three-stage score study process: broad orientation, close analysis, and final synthesis into a conducting interpretation.[2]
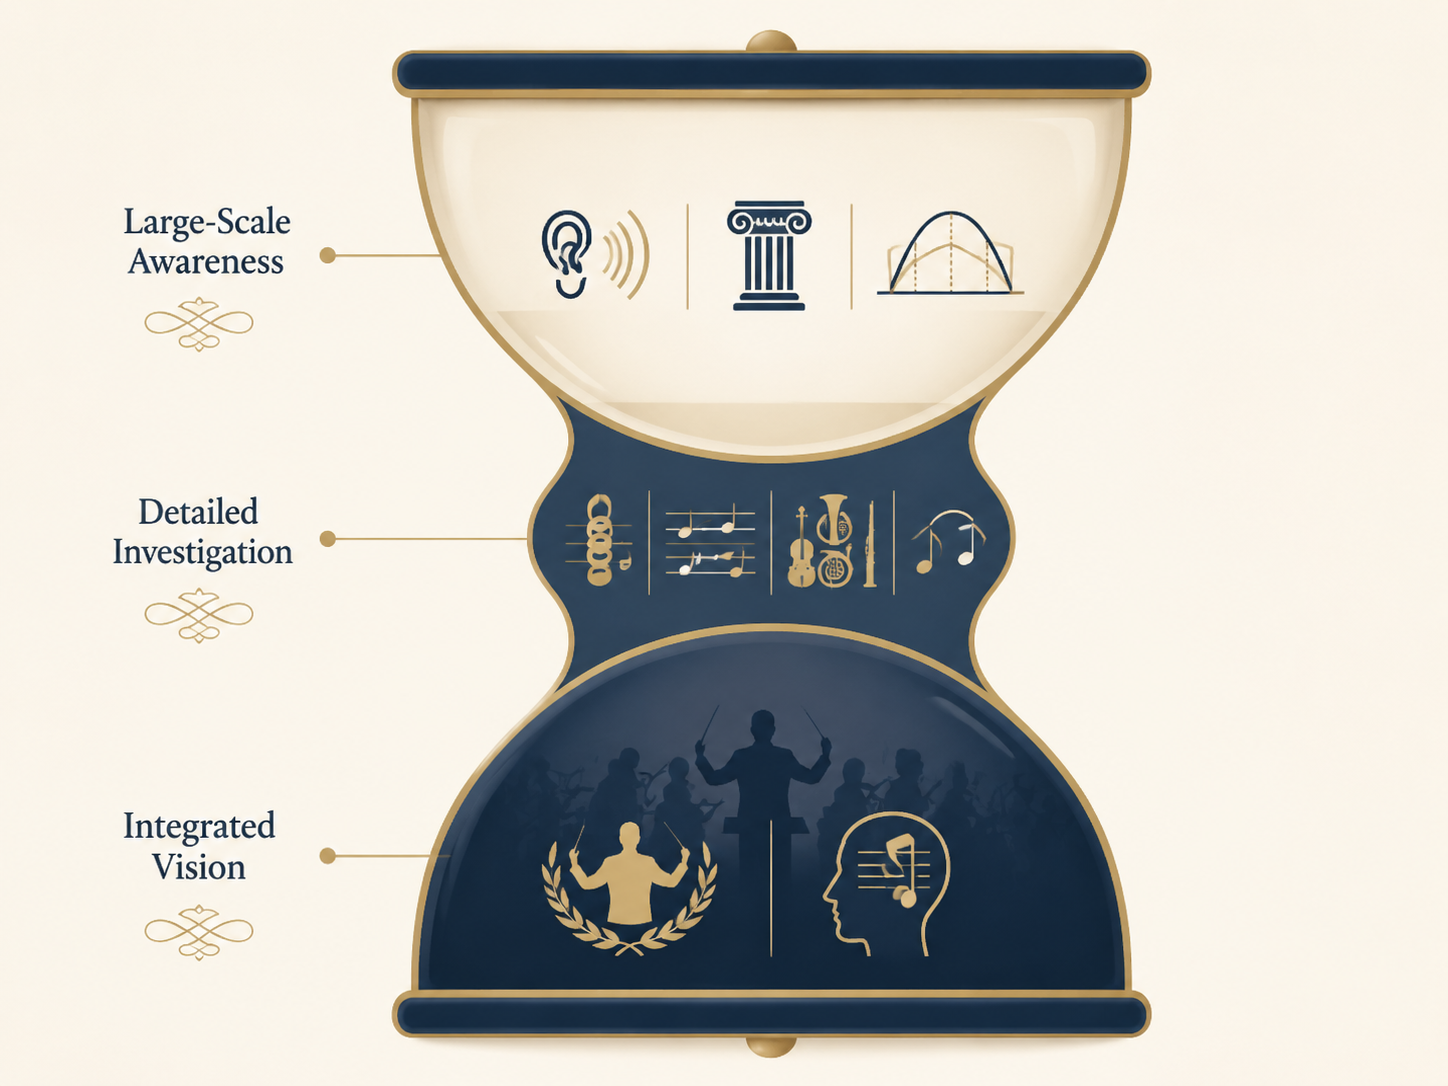
That shape matters because it protects the student from two opposite mistakes. One is to live forever in the clouds: historical context, mood words, and beautiful generalities. The other is to drop immediately into bar-by-bar survival, where every note seems equally urgent. The hourglass lets the conductor make contact with the whole piece before asking the eyes to inspect small things, and then prevents analysis from staying in fragments.
| Hourglass stage | Main question | What you physically do with the score |
|---|---|---|
| Large-scale awareness | What kind of piece is this, and how does it move? | Read the title page and instrumentation, locate major sections, notice tempo areas, identify obvious returns, transitions, and climaxes. |
| Detailed investigation | What is happening inside each passage? | Make focused passes for instrumentation, form, harmony, rhythm, dynamics, phrasing, and expressive choices. |
| Integrated vision | What will I conduct, rehearse, and remember? | Mark cues and priorities, make a one-page diagram, practice singing and conducting, then compare recordings after forming your own concept. |
The first stage does not need to become a miniature dissertation. Read program notes if they are available. Learn the basic historical or stylistic setting. Look at the instrumentation list, tempo markings, rehearsal letters, repeats, and major changes of texture. If you listen at this stage, keep it general: style, sound world, approximate scale. Do not let a recording become the rail you follow through the score.
The second stage is where the real pencil work begins. It is slower than most beginners expect, and that is not a moral failure. Kenneth Bloomquist reported spending 20–40 hours studying a single unfamiliar symphony.[3] That number should not be treated as a universal law for every piece; a short overture, a student ensemble work, or a reduced score may need less. But it is a useful correction to the fantasy that one listening session and a few circled cues equal knowing the score.
Before the Seven Passes, Make the Page Readable
A full score is not just a piano part made taller. It is a map of different instruments, some sounding where written and some transposing. A written C in a B-flat clarinet part does not sound the same as a written C in the flute. Horns, clarinets, trumpets, and some other instruments may require the conductor to know both what is printed and what actually sounds.
For early score study, do not pretend this is easy. Put a small transposition reminder at the beginning of the relevant staves if needed. Check the score’s instrumentation page before you analyze harmony. When a chord looks wrong, ask whether it is wrong in concert pitch or only unfamiliar on the page. The point is not to become fluent by embarrassment. The point is to remove enough friction that the rest of the method can work.
It also helps to scan for practical score-reading problems before deep analysis: divisi strings, percussion instrument changes, clef changes, offstage parts, solo versus tutti markings, and places where the printed layout hides who actually carries the line. These observations are not yet interpretation. They are how you stop the page from ambushing you later.
The Seven Trips Through the Score
The “seven trips through the score” approach is best understood as a conducting pedagogy tradition rather than a method with one single inventor. It appears across conducting teaching contexts and is summarized by ConductIT as a way to examine the score through separate dimensions instead of trying to understand everything simultaneously.[2] Its value is wonderfully plain: on each pass, the eyes have one job.
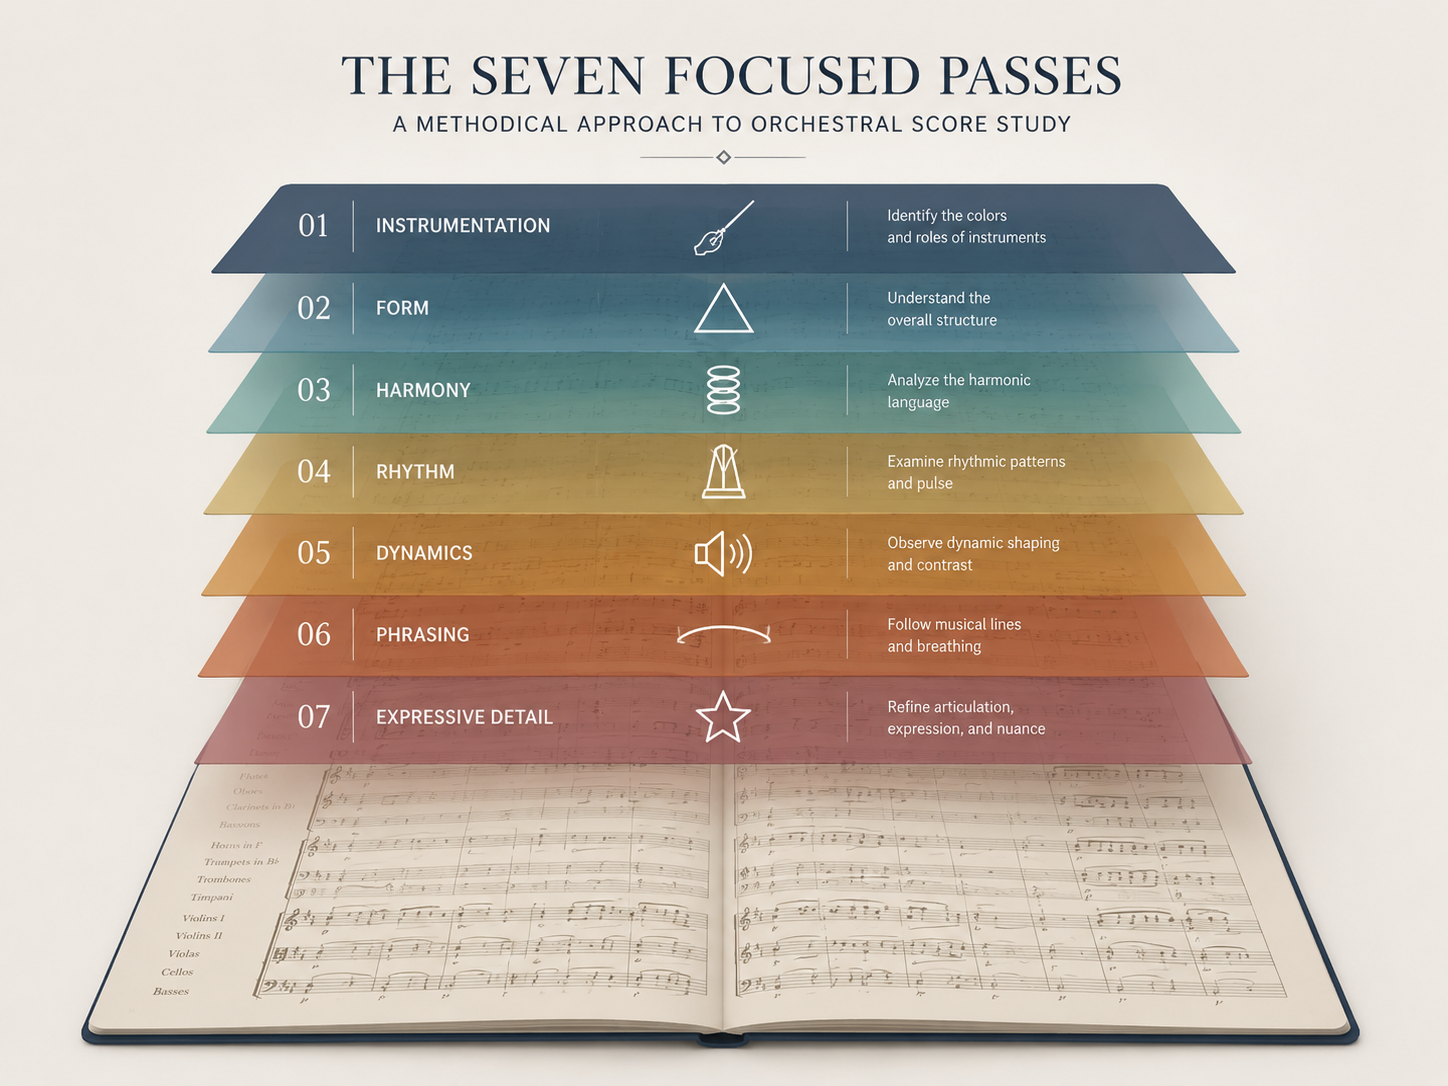
The seven common passes are instrumentation and orchestration, form and large structure, harmony and tonal plan, rhythm and meter, dynamics and articulation, phrasing and line, and expressive detail or interpretive choice.[2] They do not need to take equal time. A rhythmically simple slow movement may ask more from harmony and phrase direction. A dance movement with constant meter games may make rhythm the main battlefield. The method is fixed enough to reduce overload and flexible enough to respect the piece.
Pass 1: Instrumentation and Orchestration
Begin by asking who is playing, who is silent, and how the sound changes. Mark major texture shifts lightly: strings alone, winds entering, brass reinforcement, percussion color, solo lines, tutti passages, divisi writing. Notice doublings. If the oboe and first violins share a melody but the oboe attacks first, your ear and gesture may need to favor the wind entrance even if the violins look visually dominant on the page.
This pass is also where you begin a practical relationship with the orchestra. The score stops being a vertical stack of staves and becomes a set of human entrances. Someone is counting. Someone has been silent for many bars. Someone changes instruments. Someone needs time to breathe. The conductor who sees those facts early studies differently.
Pass 2: Form and Large Structure
Now zoom out. Find the large sections and write them in the margin or on a separate page. This could mean exposition, development, and recapitulation; theme and variations; refrain and episodes; an introduction followed by an allegro; or simply a sequence of contrasting tempo areas. The label matters less than the act of locating the joints.
Look for returns, expansions, compressions, transitions, and arrivals. Ask where the piece spends time and where it moves quickly. If rehearsal time becomes scarce, these structural decisions will help you know which transitions cannot be left vague.
Pass 3: Harmony and Tonal Plan
The harmony pass should answer more than “what chord is this?” A conductor needs to know where the music is stable, where it is leaning, where tension accumulates, and where a cadence, pedal point, modulation, or deceptive motion changes the weight of time. This is especially important in passages where the beat pattern is simple but the music is not.
For transposing scores, check suspicious sonorities in concert pitch before drawing conclusions. A beginner’s harmonic analysis can go badly wrong if clarinet, horn, and trumpet parts are read as though all instruments sound exactly where written. A slow, accurate reduction of a few difficult bars is better than a confident misreading of a whole page.
Pass 4: Rhythm and Meter
On the rhythm pass, ignore the temptation to sing every melody beautifully. Count. Find syncopations, hemiolas, subdivisions, ties across the bar, tempo changes, fermatas, meter changes, and places where different sections feel the pulse differently. Mark the spots where your gesture must clarify subdivision rather than merely display the printed meter.
This is also where the conductor decides what the ensemble is likely to misunderstand. A passage may be easy for the eye at a desk and unstable in a room because the low strings move on offbeats, winds sustain across barlines, and percussion articulates a different layer. The score is already telling you where rehearsal attention may go.
Pass 5: Dynamics and Articulation
Dynamics and articulation are not decorations added after the real analysis. They reveal hierarchy. A marked piano melody in one instrument may still need to project because everything around it is softer or more transparent. A forte accompaniment may need restraint if the primary line sits elsewhere. During this pass, compare markings across the ensemble instead of reading each staff in isolation.
Articulation also tells the hands what kind of contact the sound needs: lifted, sustained, biting, brushed, heavy, or released. Mark only what you will use. If every accent receives the same visual alarm, none of them will matter when you are standing in rehearsal.
Pass 6: Phrasing and Line
The phrasing pass is where you sing. Not performatively, not necessarily well, but honestly enough to learn breath, direction, and arrival. Sing the obvious melody, then sing inner lines and bass motion. A conductor who has only sung the top line may miss the viola figure, bassoon answer, or harmonic bass that actually explains why the phrase needs to move.
Gianmaria Griglio includes singing while practicing among the ways conductors can work at home, and the reason is practical: singing tests whether the conductor has internalized the music rather than merely recognized it visually.[5] If you cannot sing or audiate a line away from the instrument, your gesture may become a metronome with opinions.
Pass 7: Expressive Detail and Interpretive Choices
Only after these passes does interpretation begin to feel earned. Decide where the music presses forward, where it waits, which dissonances need time, which transitions need restraint, and which climaxes are structural rather than merely loud. Write choices in language that will still mean something next week. “Don’t rush before letter C” is often more useful than “mysterious.”
This is the point at which recordings become most tempting, and also most dangerous. Woods, Bloomquist, and Griglio all warn in different ways against using recordings as the primary learning tool before forming one’s own interpretation.[1][3][5] Recordings are not poison. They are evidence of other musicians’ decisions. If they arrive too early, they can quietly replace the student’s first responsibility: to decide what the score seems to require.
Turn Study Into a Rehearsal Score
After the detailed passes, the work changes character. The question is no longer only what the piece means. It is what you need to see fast enough to act. A rehearsal score is not a museum of every thought you had at the desk. It is a working object.
Bloomquist’s marking system is useful because it is concrete without being fussy: red for loud dynamics, blue for soft dynamics, and yellow for primary melodic lines.[3] The exact colors are less sacred than the consistency. If yellow always means “main line,” the eye can find the line under pressure. If every color means whatever you felt that afternoon, the markings become another layer of noise.
- Use one color or shape for primary material, so the main line is visible even in dense textures.
- Use a separate marking for unusually soft or exposed entrances, because those often need preparatory attention.
- Mark only the dynamics that change your conducting decision; do not highlight every printed marking by habit.
- Keep cue markings in the margin where the eye naturally travels before the entrance.
- Leave enough white space that later rehearsal discoveries can still enter the score.
Cueing is where preparation becomes especially physical. Bloomquist advises marking cues in the margin at least 4–8 measures before the entrance, so the conductor sees them early enough to prepare the player rather than merely notice the entrance as it happens.[3] Band Directors Talk Shop likewise emphasizes practical score marking and cue placement as part of efficient score study.[4] The cue is not just a reminder to look up. It is a reminder that another person is waiting for information from you.
A cue mark should tell you who needs help and why. “Hn. after 32 bars rest” means something different from “flute melody returns” or “timpani pitch change.” In a quiet entrance after a long rest, the player may need eye contact and a clear breath. In a sectional entrance inside a loud texture, the ensemble may need a larger preparatory gesture. In a tempo change, everyone may need the cue, not only the printed section.
Make a One-Page Diagram
The one-page diagram is a severe but friendly test. Bloomquist describes the expectation that a conductor should be able to put the piece onto a single 8.5×11 sheet.[3] That does not mean copying tiny measure numbers until the page becomes unreadable. It means deciding what the piece’s structural pillars are: sections, tonal areas, tempo changes, major transitions, exposed entrances, climaxes, and rehearsal danger spots.
A useful diagram might have a timeline across the page, rehearsal letters underneath, key or tonal areas above, and short notes for major events. For a hypothetical orchestral movement, the diagram might show an opening theme, a transition with unstable rhythm, a quieter contrasting section, a long crescendo, a return of the opening material, and a coda with exposed brass and timpani. The details will change with the piece; the discipline is the same.
This exercise catches a particular kind of false knowledge. You may be able to explain three beautiful bars and still not know where the piece is going. A diagram forces proportion. It asks whether the conductor can move from local detail back to large-scale memory, which is exactly the lower half of the hourglass.
Practice Away From the Ensemble
An aspiring conductor can practice the whole cycle alone on a manageable orchestral work. Choose a score short enough that you can finish the process rather than admire the method from a distance. A short overture, a movement from a classical symphony, or a well-edited educational orchestral score can teach more than a massive work that remains permanently half-studied.
Work in this order: first orient yourself to the whole piece, then make the focused passes, then mark the score for rehearsal, then create the one-page diagram, then stand up and conduct while singing or audiating the parts you need to hear. Only after that should recordings become serious study partners. At that point, listening can sharpen your thinking: another conductor’s tempo may expose a weakness in your plan, or confirm that your slower transition has musical reasons.
Bloomquist’s standard for memory is deliberately vivid: “I tell my students that if someone put a gun to your head, you could conduct that piece without the score.”[3] The image is extreme; the study principle is not. The goal is not theatrical toughness. It is to know the piece well enough that the score supports your conducting rather than rescues it every second.
A final self-test is simple. Close the score and describe the form. Sing or speak through the principal entrances. Name the places where tempo, balance, rhythm, or cueing will require rehearsal attention. Open the score and check whether your markings actually show those priorities. Look at the one-page diagram and ask whether it would help you recover if you felt lost in the middle of rehearsal.
That is how score fluency begins to form: not by absorbing everything at once, and not by copying a recording into your hands, but by returning to the same page with a different job each time. The score gradually stops looking like a wall of notation. It becomes a set of relationships, decisions, and responsibilities you can carry into the room.
References
- On Study and Preparation, Kenneth Woods, March 16, 2020.
- The Score Study Process, ConductIT.
- Kenneth Bloomquist on the Art of Score Study, The Instrumentalist, April/May 2024.
- Make Your Mark: Steps Toward Efficient Score Study, Band Directors Talk Shop.
- How to Practice Orchestra Conducting at Home: Dos and Don’ts, Gianmaria Griglio.
Comments
Join the discussion with an anonymous comment.