How to Set Up Obsidian for Your Classes in 15 Minutes
✓ After this tutorial: A minimal Obsidian vault with a 4-folder structure, Templater and Dataview plugins, and a lecture-note template for linked note-taking.
This guide walks through a minimal Obsidian setup for university students — a 4-folder vault structure, two essential plugins, and a lecture-note template — so you can start taking linked notes in about 15 minutes without feeling overwhelmed by options.
Open Obsidian before class, not after you have watched three setup videos and renamed every folder twice. The goal is deliberately small: one vault, four folders, two community plugins, one lecture-note template, and one linked note you can actually use today.
That should take about 15 minutes if you resist the urge to solve your entire academic life on day one. Obsidian can become a serious long-term study system, but the first win is much less dramatic: you leave lecture with notes you can find again.

The overwhelm is real. In one Obsidian forum thread about using the app for college, a student describes getting pulled between Zettelkasten, PARA, folders, tags, plugin recommendations, and conflicting advice from more experienced users; the thread drew 21 replies, which is a pretty good snapshot of how quickly “take better notes” turns into “design an information architecture before Monday.” [1]
So this setup makes one bet: the default app plus a simple folder structure and two plugins covers most text-heavy class note-taking needs. If you are doing lab sketches, studio work, heavy math handwriting, or annotation-first reading, you may need another layer later. For typed lecture notes, readings, assignments, and review, this is enough to start.
The 15-minute setup path
| Time | Action | Stop there when |
|---|---|---|
| 0-2 min | Download Obsidian and create one vault | You can see an empty workspace |
| 2-6 min | Create four folders: Classes, Notes, Assignments, z-Attachments | Your sidebar has a place for course material, notes, work due, and files |
| 6-9 min | Turn on community plugins and install Templater and Dataview | Both plugins are enabled, and nothing else is installed |
| 9-13 min | Create one lecture-note template | You can insert the same simple structure into a new note |
| 13-15 min | Make your first class note and link it to another note | You have written and linked one usable note |
If you already use another note-taking app and want to compare where Obsidian fits, the broader best study tools for college students guide is a better place for that decision. Here, assume you have chosen Obsidian and need a working class setup, not a buying tour.
Start with one vault
Download Obsidian, open it, and create one new vault. Name it something boring, such as “College Notes” or “University.” The vault is just the folder where Obsidian stores your Markdown files. You do not need a vault for every class, every semester, or every identity you might have as a person who studies chemistry but also likes films.
Curtis McHale’s student vault setup recommends keeping coursework in a single vault across semesters, using a small folder structure inside it rather than splitting the whole academic archive into separate vaults.[2] Aidan Helfant’s beginner Obsidian guide also supports starting from a simple single-vault setup instead of making vault architecture the first project.[3]
There is a fair exception: if you later have clearly separate domains, such as university coursework, a job research archive, and a private writing project, separate vaults can make sense. That is a later decision. In week one, separate vaults mostly create more places to lose things.
Create four folders, then stop organizing
In the left sidebar, create these four folders:
- Classes
- Notes
- Assignments
- z-Attachments
This structure comes from McHale’s Obsidian student vault, where the main folders are Classes, Notes, Assignments, and z-Attachments.[2] The useful part is not that these names are sacred. The useful part is that each folder answers a different question a student actually has.
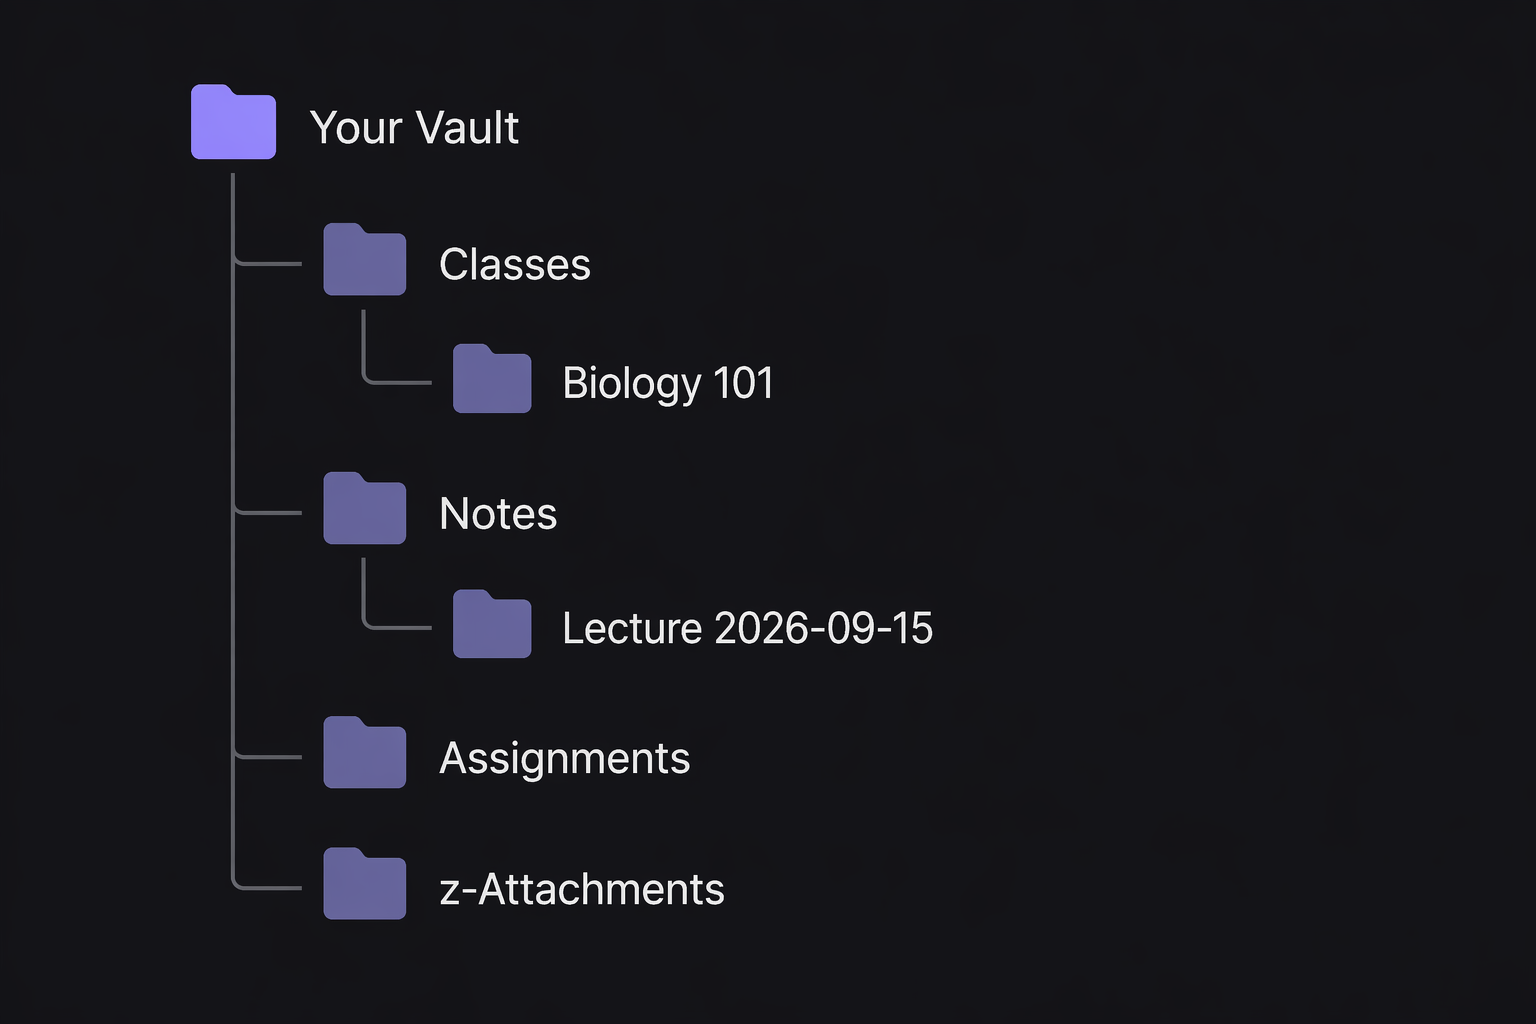
Classes is for the course home base
Inside Classes, make one folder per course. For example:
- Classes/Biology 101
- Classes/History 220
- Classes/Statistics 201
Each course folder can hold the syllabus, course overview, exam dates, professor information, and a running index of important notes. Think of it as the course dashboard, not the place where every daily lecture note must live.
A simple course home note might look like this:
# Biology 101

Professor:
Office hours:
Exam dates:

## Important links
- [[BIO101 - Lecture 01 - Cell Structure]]
- [[BIO101 - Lecture 02 - Membranes]]

## Assignments
- [[BIO101 Lab Report 1]]
This is already more useful than a beautiful graph view. It tells you where the course lives, what matters soon, and which notes you need to revisit.
Notes is for actual thinking
Put lecture notes, reading notes, concept notes, and study explanations in Notes. This keeps the work you write separate from the administrative shell of each class.
A lecture note can still belong to a class through its title and links. You do not need to bury it six folders deep. Use names that sort well and make sense later:
- BIO101 - Lecture 01 - Cell Structure
- HIST220 - Reading - Industrialization
- STAT201 - Concept - Standard Error
The title carries the class code. The note body can link back to the class home note. That is enough structure for search, linking, and review without requiring a naming manifesto.
Assignments is for work with consequences
Assignments deserves its own folder because deadlines behave differently from notes. A lecture note can sit quietly until exam week. An assignment needs a due date, status, requirements, files, and sometimes a rubric.
For each assignment, create one note. Keep it plain:
# BIO101 Lab Report 1

Class: [[Biology 101]]
Due:
Status: Not started

## Requirements
-

## Questions for professor or TA
-

## Draft notes
-
This is also where Dataview becomes useful later, because assignments have predictable fields like class, due date, and status. For the first 15 minutes, just make the folder and one assignment note if you already have something due.
z-Attachments is for files you do not want to manage by hand
Slides, PDFs, screenshots, and images can clutter a vault fast. The z-Attachments folder is a parking lot for those files. The “z” keeps it near the bottom of the file list, which is a small mercy during a semester.
To make Obsidian save attachments there automatically, open Settings, go to Files and links, find the attachment folder setting, and choose z-Attachments. The exact wording may shift across app versions, but the idea is simple: notes stay readable, files go into the file bin.
Install only Templater and Dataview
Now turn on community plugins. In Obsidian, open Settings, go to Community plugins, enable them, browse plugins, and install two:
- Templater, for inserting repeatable note structures
- Dataview, for listing notes and assignments based on fields
Effortless Academic’s beginner Obsidian guide identifies Templater and Dataview as essential starting plugins for students, which lines up with the practical split here: one plugin helps you create notes faster, the other helps you find structured academic work later.[4]
That does not mean every useful plugin is essential. Calendar plugins, spaced repetition plugins, task systems, citation managers, theme packs, and AI add-ons can all be useful in the right workflow. They can also turn your first study session into software shopping. Install two now. Let actual friction choose the third.
Make one lecture-note template
Create a folder called Templates. If you hate having five top-level folders, put it inside Notes. Then create a note named Lecture Note Template.
# <% tp.file.title %>

Class:
Date:
Topic:

## Main ideas
-

## Details and examples
-

## Questions
-

## Links
-
In Templater settings, set your template folder to wherever you put that file. Then open a new note, run the Templater insert command, and choose Lecture Note Template.
This template is intentionally plain. Aidan Helfant’s beginner guide supports the same kind of lightweight lecture-note approach: enough scaffolding to start, not so much structure that every lecture becomes data entry.[3]
If you already use Cornell notes, outline notes, or mapping, Obsidian can hold those formats too. The point is that you do not have to pledge loyalty to one method before taking notes. If you want the research argument for structured note formats, the Cornell-focused piece on whether the Cornell Method actually works and the comparison of Cornell, outline, mapping, and digital note-taking are better detours than trying to settle that debate inside your first vault.
Take your first linked note
Now make the system prove itself. Create a new note in Notes and name it something like BIO101 - Lecture 01 - Cell Structure. Insert the lecture template. Fill in the class, date, and topic. Then add one link back to the course home note:
Class: [[Biology 101]]
Date: 2026-09-02
Topic: Cell Structure
During lecture, do not try to make every sentence linkable. Capture the main ideas and the confusing parts. If the professor spends ten minutes on mitochondria and mentions ATP repeatedly, you might create a link like this:
Mitochondria produce ATP through cellular respiration. See [[ATP]] for the energy-transfer concept.If [[ATP]] does not exist yet, that is fine. Obsidian will show it as a link you can create later. This is the part of Obsidian that is actually useful for students: today’s lecture can point to tomorrow’s study note without forcing you to finish the whole explanation during class.
After class, spend two minutes cleaning only what would hurt future you. Add one or two clearer headings. Turn one repeated concept into a link. Write one question you would ask in office hours. Do not reorganize the vault as a reward for surviving lecture.
Use Dataview after you have something to view
Dataview is powerful, but it should not be the first thing you touch. Its job is to pull lists out of notes that already have consistent fields. For students, the most useful early case is assignments.
If you put simple fields at the top of assignment notes, such as class, due, and status, Dataview can later produce a live assignment list. A basic assignment note might start like this:
---
class: Biology 101
due: 2026-09-18
status: Not started
---

# BIO101 Lab Report 1
Then a dashboard note can include a Dataview query like this:
TABLE class, due, status
FROM "Assignments"
SORT due ASC
You do not need this dashboard on day one. If the query works, great. If it feels like programming when you just need to read Chapter 3, leave it for the weekend. A working assignment note beats a broken dashboard every time.
What to ignore for now
Some Obsidian features are useful later, but they are bad first-hour projects:
- Graph view is fun to look at once you have notes, but an empty graph does not help you understand today’s lecture.
- Zettelkasten and PARA can wait until you can explain the problem they would solve in your own vault. They are organizational methods, not entrance exams.
- Elaborate tag systems are useful when they answer a repeated retrieval problem. If you have only six notes, search and links are enough.
- Theme tweaking can wait until your notes exist. Readability matters, but a perfect dark theme will not remind you what the professor said about the midterm.
This is not anti-power-user advice. In a separate Obsidian forum discussion about organizing academic work after four years, experienced users discuss approaches that evolved over long-term use, with 16 replies showing that academic systems can mature substantially over time.[6] The important word is “evolved.” They did not need to be fully designed before the first lecture.
A quick note on cost
Obsidian’s core app is free for personal use, and Obsidian listed a 40% student discount for Sync and Publish on its official discounts page as of mid-2026.[5] Pricing and discounts can change, so check the current page before you build a workflow around paid syncing.
You do not need Sync to test this setup on one laptop. If you later want notes across devices, then compare Obsidian Sync with whatever storage and backup habits you already trust.
What you should have after 15 minutes
- One vault for your college notes
- Four folders: Classes, Notes, Assignments, and z-Attachments
- Templater and Dataview installed, with no plugin pileup
- One reusable lecture-note template
- One real lecture note linked back to its class
That is enough. Use it for a week or two. Notice what is actually annoying: maybe assignments need better tracking, maybe readings need their own template, maybe one class produces diagrams that belong somewhere else. Add structure when a real problem repeats, not when a stranger’s vault screenshot makes you feel behind.
Obsidian can grow with you, but only after there are notes to grow from. Open the app, take the note, link the concept, and let the system earn its next layer.
References
- My struggles with Obsidian for college: asking for organization advice, Obsidian Forum
- Obsidian Student Vault, Curtis McHale, June 21, 2023
- The Only Beginner Obsidian Guide You’ll Ever Need, Aidan Helfant
- Getting Started with Obsidian for Beginners, Effortless Academic
- Discounts, Obsidian Help
- How do you organize academic work in Obsidian? Here’s my approach after 4 years, Obsidian Forum
Next Steps
- The Complete Guide to Downloading Anki Flashcards (App + Shared Decks + Import) →
A step-by-step tutorial for beginners covering the full Anki flashcard pipeline: downloading the app on any device, finding quality pre-made shared decks, and importing .apkg files correctly. Designed for students and lifelong learners who get stuck on deck sourcing and import.
- How to Make Your Own Quizlet Flashcards: A Complete Step-by-Step Tutorial →
Learn four methods to create your own Quizlet flashcard sets — manual entry on web and mobile, document import, and AI-powered Magic Notes — with clear free vs. Plus limitations at every step. Perfect for high school and college students who want to build custom study materials.
- How to Create Your Own Quizlet Study Sets: The Complete Step-by-Step Guide (2026) →
Learn the three ways to create Quizlet flashcard sets in 2026: manual entry, importing from notes, and AI generation from PDFs and slides. This step-by-step tutorial covers each method, editing and formatting options, visibility settings, and pro tips to help you study smarter.
Comments
Join the discussion with an anonymous comment.