
Method
Find Meteor Craters with Google Earth Pro
This tutorial walks through Google Earth Pro's terrain, ruler, and elevation tools along with the free Impact Earth KMZ overlay to help you locate, measure, and explore Earth's ~190 confirmed impact craters — no geology background required.
Evidence panel
- Evidence level
- Moderate
- Primary citation
- Earth Impact Database, Western University
If you want to learn how to find meteor craters using Google Earth, start with a small correction: do not begin by roaming the planet for circles. Begin with Google Earth Pro on the desktop, turn on terrain, and load a confirmed-crater overlay. The point is not to make a circular shape look convincing. The point is to ask a sequence of questions that Google Earth can actually answer: where is the confirmed structure, does the landform have relief, how wide is it, and what does the cross-section look like?
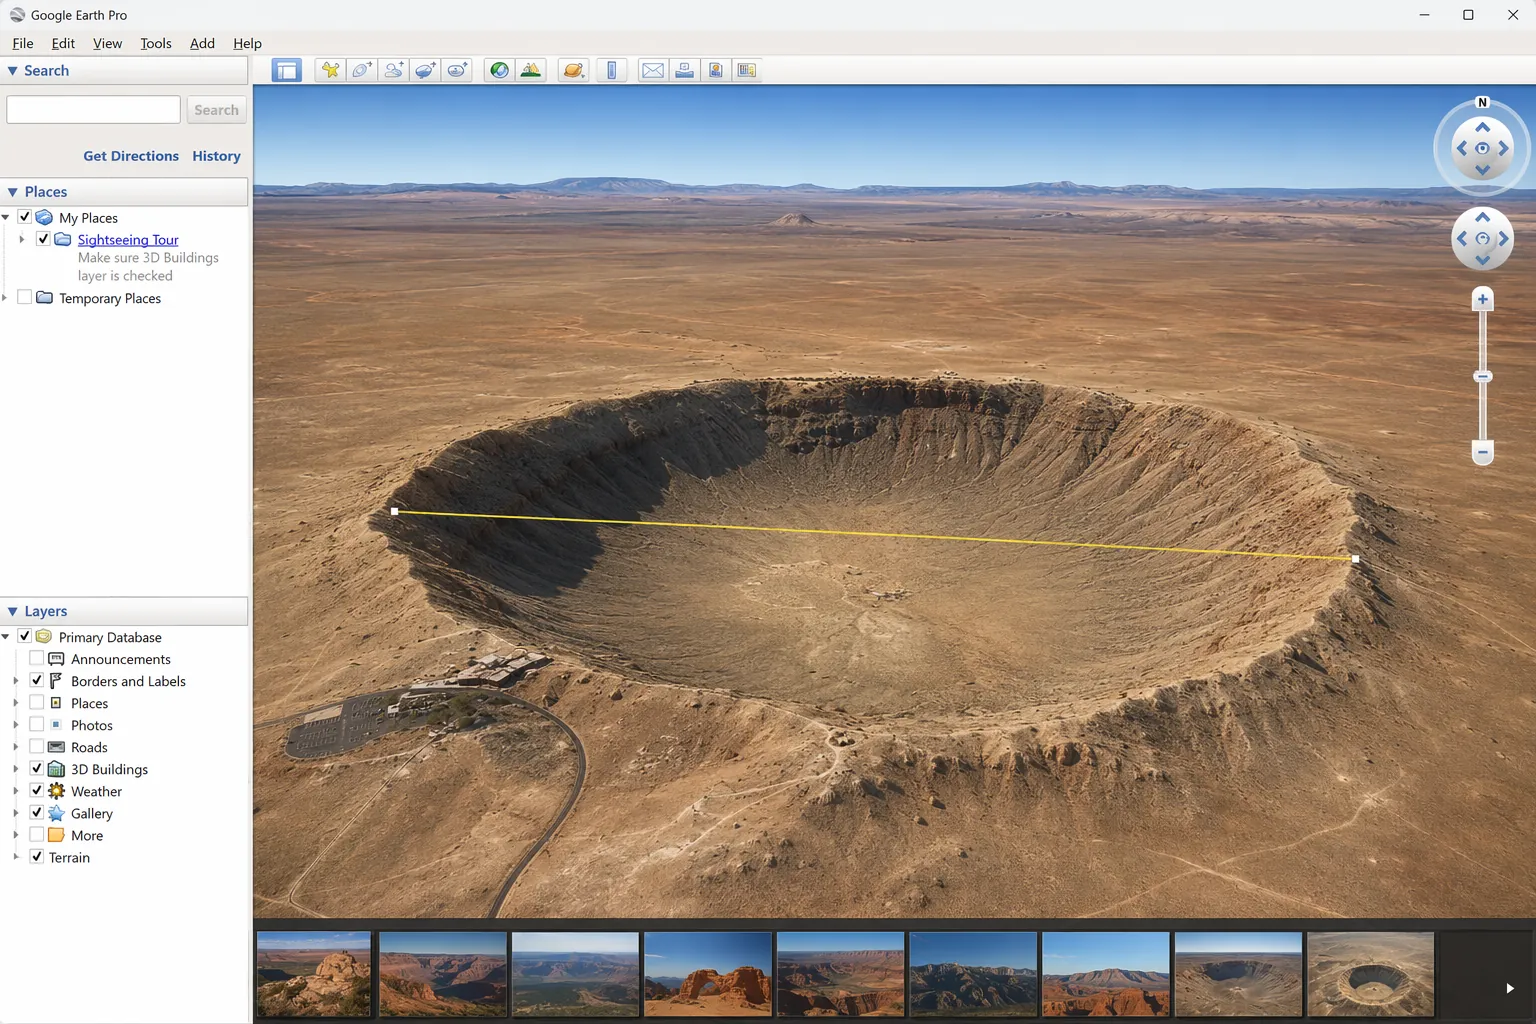
Use Google Earth Pro rather than the browser or mobile version for this workflow, because the desktop app gives you the Terrain layer, Ruler tool, path drawing, and Elevation Profile tools you need for measurement and topographic reading.[1] Then load the free Impact Earth KMZ from Western University’s Earth Impact Database, which provides placemarks for confirmed terrestrial impact structures.[2]
Set Up Google Earth Pro Before You Search
Install or open Google Earth Pro, not Google Earth in a browser tab. In the Layers panel, make sure Terrain is enabled. Without terrain, many craters become decorative circles on an image mosaic. With terrain, a raised rim, bowl-shaped interior, eroded ring, or central remnant can start to read as a landform.
Next, download the Impact Earth KMZ from the Earth Impact Database map page and open it in Google Earth Pro. The placemarks matter because Earth has only about 190 confirmed impact craters, while the Moon has more than 2 million visible impact craters; weathering, burial, and plate tectonics erase or hide much of Earth’s record.[3] A confirmed-crater overlay keeps the exercise honest. You are not trying to prove every round lake or desert ring is an impact structure. You are learning what confirmed structures look like under different preservation conditions.
Once the KMZ is loaded, save it under Places so it remains available the next time you open Google Earth Pro. Expand the folder, choose a crater, and double-click the placemark. If the view lands on a center coordinate rather than an obvious rim, do not assume the overlay is wrong. Many coordinates mark the approximate center of the structure. Zoom out, tilt the view slightly, and scan the surrounding terrain before judging what is visible.
Use a Clean Teaching Crater First
Barringer Crater, also known as Meteor Crater, is the best first stop because it rewards the full workflow. It is a simple, well-preserved crater in Arizona, about 1.2 km across and about 50,000 years old, with a raised rim and an interior that still reads clearly in satellite view and terrain view.[2] It is also a useful reminder that “visible” and “publicly accessible” are different things: the crater is privately owned, so Google Earth is often the cleanest way to study its shape from above.
After the placemark brings you to the crater, resist the urge to stop at recognition. Recognition is the weakest part of the method. Google Earth becomes useful when you make the image answer separate questions.
- Terrain asks: is there topographic relief, or only a color pattern on the surface?
- The Ruler tool asks: does the visible feature have the expected diameter?
- The Elevation Profile asks: does the cross-section show a rim, depression, central high, or erosion pattern consistent with the known crater?
- The KMZ placemark asks: am I studying a confirmed structure rather than inventing one from a circular outline?
The Crater Workflow: Placemark, Terrain, Diameter, Profile
Use the same order every time, especially while you are still learning. A repeatable order prevents the common mistake of deciding too early that a round feature “looks like” an impact crater and then using the tools only to defend that impression.
| Action | Tool | What It Answers |
|---|---|---|
| Open a confirmed placemark | Impact Earth KMZ | Am I looking at a documented impact structure? |
| Turn on topography | Terrain layer | Is the crater expressed as landform relief? |
| Measure across the rim | Ruler tool | Does the visible diameter match the known structure? |
| Draw a line across the crater | Path tool | Where should the elevation profile be sampled? |
| Read the cross-section | Elevation Profile | Do the rim, floor, and central features make sense? |
1. Open the confirmed placemark
In the Impact Earth KMZ folder, choose Barringer/Meteor Crater and let Google Earth Pro fly to the location. Keep the Places panel open. It gives you a controlled starting point, and it makes it easy to move later from a well-preserved crater to a lake-filled, eroded, or partly buried one.
2. Turn on Terrain and tilt the view
With Terrain enabled, tilt the view low enough that the crater stops being only a circle and becomes a shallow piece of architecture. At Barringer, the rim stands out against the surrounding desert, and the interior reads as a bowl. If the feature disappears when you change angle, you may be looking at a surface color pattern, a playa, agricultural boundary, volcanic feature, or image artifact rather than a meaningful relief form.
Do not over-tilt. A dramatic 3D angle can exaggerate relief and make modest terrain look theatrical. Use tilt to understand the form, then return closer to a top-down view when measuring.
3. Measure rim-to-rim, not whatever circle is easiest
Select the Ruler tool and measure across the crater from rim to rim. For a simple crater such as Barringer, the outer raised rim is the target. Do not measure only the flat interior floor, and do not use a slump terrace or shadow line just because it is visually crisp. The useful measurement is the crater’s apparent rim-to-rim span, then checked against the known value from the confirmed database.
Google Earth Pro’s Ruler tool can measure distance directly on the map, and its path tools can be used later with elevation data.[1] For Barringer, a good rim-to-rim line should come out close to the published 1.2 km diameter, not a dramatically different number.[2] If your measurement is far off, the usual problem is not Google Earth. It is that the line started on an inner slope, missed part of the rim, or crossed the crater off-center.
4. Draw a profile path across the landform
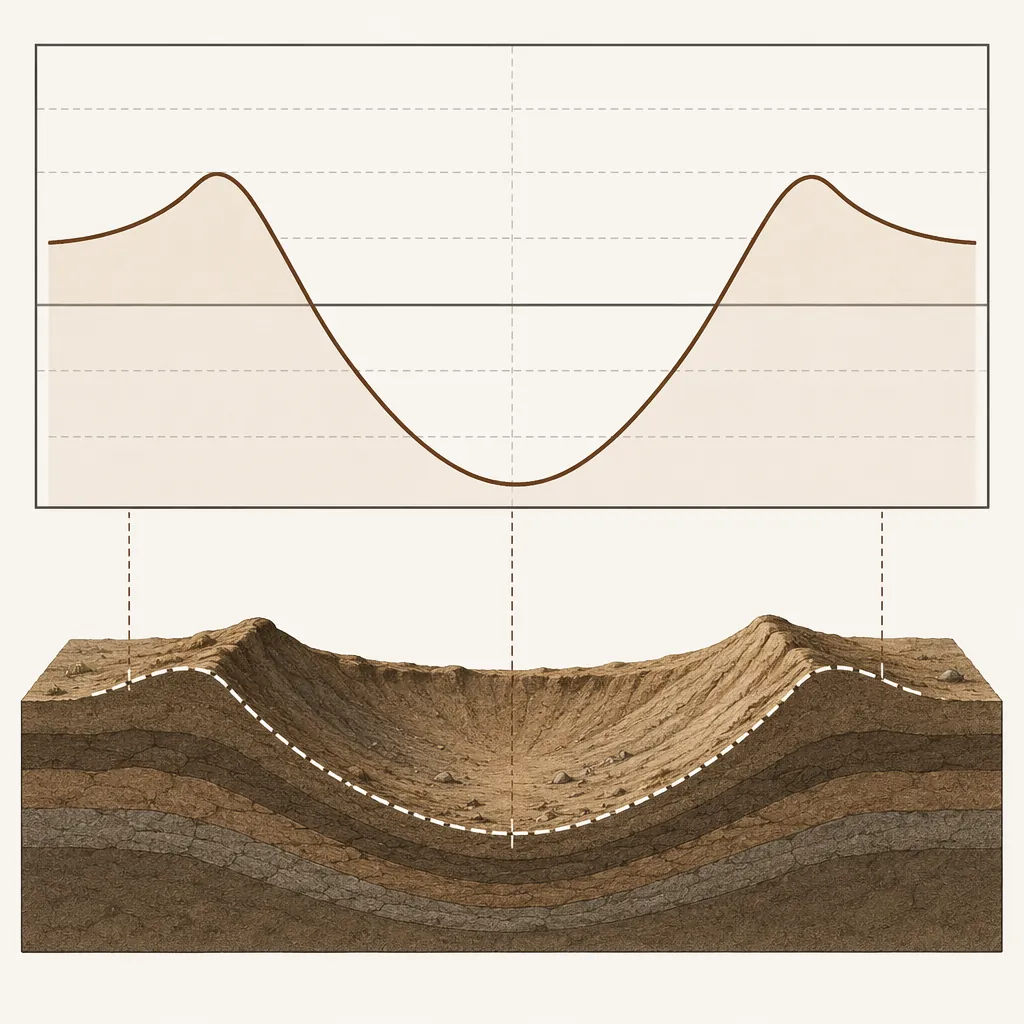
Now draw a path across the crater. Run it beyond the rim on both sides so the profile includes surrounding terrain as well as the crater itself. A line that begins and ends inside the crater can show the floor, but it cannot show whether the rim is raised above the local surface.
After drawing the path, use the Elevation Profile command. Google Earth Pro can display the elevation profile for a path, letting you inspect changes in height along the line.[1] On a clean simple crater, you are looking for a cross-section that makes topographic sense: approach surface, raised rim, descent into the bowl, rise toward the opposite rim, and return to surrounding terrain.
5. Compare the profile with the image, not instead of it
The elevation profile is not a magic crater detector. It is a check on what the image suggests. A circular lake may give you a depression. A volcanic maar may give you a rimmed basin. A salt pan may be flat but visually round. The profile helps you describe what is there, while the confirmed database tells you whether that landform is already established as an impact structure.
This is where the workflow earns its keep. You are no longer saying, “That looks round.” You are saying, “The confirmed placemark sits here; the terrain shows a raised rim; the diameter agrees with the listed structure; and the profile cuts across a bowl rather than a flat stain.” That is a much stronger observation, and it is still appropriately cautious.
Starter Craters That Teach Different Visual Lessons
After Barringer, do not simply collect pretty crater views. Move through examples that break the expectation that every impact crater should look like a fresh Moon crater. The Earth Impact Database and cross-reference lists provide names, locations, dimensions, and ages for confirmed structures, but Google Earth will show them with very different levels of clarity depending on preservation, surface cover, and erosion.[2][4]
| Crater | Where to Look | What It Teaches in Google Earth |
|---|---|---|
| Barringer / Meteor Crater | Arizona, United States; about 35.0275°N, 111.0228°W | A clean simple crater: raised rim, bowl, and diameter measurement around 1.2 km. |
| Wolfe Creek | Western Australia; about 19.17°S, 127.80°E | A well-preserved desert rim where the circular form remains easy to read. |
| Tswaing | South Africa; about 25.41°S, 28.08°E | A circular crater partly filled by a lake, useful for separating water outline from rim relief. |
| Pingualuit | Quebec, Canada; about 61.28°N, 73.66°W | A near-perfect circular lake where the water surface is obvious but the rim still deserves terrain inspection. |
| Tenoumer | Mauritania; about 22.92°N, 10.41°W | A desert crater with a strong circular expression and limited visual clutter. |
| Roter Kamm | Namibia; about 27.77°S, 16.29°E | A Namib Desert structure where the rim is visible but the crater is older and more subdued than Barringer. |
| Gosses Bluff / Tnorala | Northern Territory, Australia; about 23.82°S, 132.31°E | An eroded remnant where the visible ring is not the original full crater diameter. |
Wolfe Creek, Tenoumer, and Roter Kamm are good desert comparisons because bare ground makes rims easier to read. Tswaing and Pingualuit are better for learning restraint. A circular lake is tempting because the outline is so clean, but water shows the present basin, not necessarily the full impact structure. Measure the rim or structural edge where it is visible, not merely the shoreline.
Gosses Bluff is the useful troublemaker in the starter set. Its visible structure is about 5 km across, while the known impact event is far older and more eroded than the young simple craters; it is listed at about 142.5 million years old.[2] In Google Earth, the dramatic central ring is not a failure because it does not look like Barringer. It is the lesson: erosion can leave the resistant inner architecture while removing the broader original form.
What the Tools Can and Cannot Prove
Google Earth Pro can help you locate, measure, and compare confirmed craters. It cannot, by itself, confirm a new impact crater. Formal crater identification depends on diagnostic geological evidence, not only circular shape. The USGS notes that confirming an impact crater requires evidence such as shocked minerals, shatter cones, or other impact-related features that cannot be established from satellite imagery alone.[5]
That boundary should make the exercise more interesting, not less. Once you stop trying to turn Google Earth into a discovery machine, the software becomes a strong study tool. You can compare landforms, test measurements against known diameters, see how topography changes with age and erosion, and build a mental catalog of what confirmed impact structures actually look like on Earth.
For a companion discussion of visual false positives and the citizen-science side of crater spotting, use How to Spot Impact Craters on Google Earth for Study. For broader study uses of map tools in science prep, see How to Use Google Earth for Science Discovery on the MCAT and SAT.
Why Some Famous Craters Barely Show Up
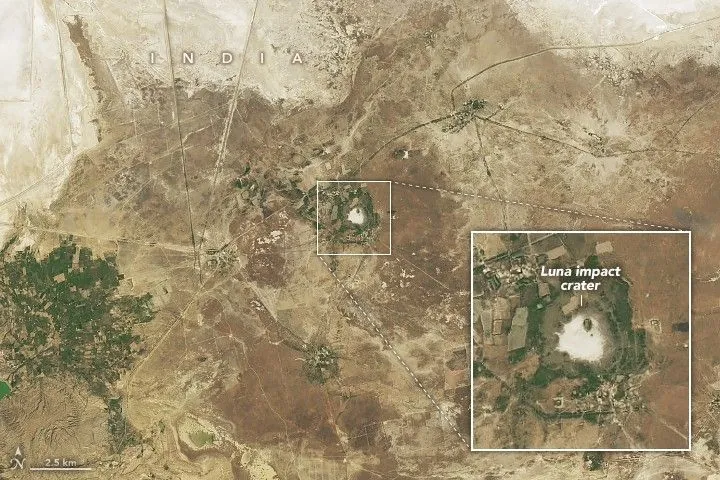
Once the workflow feels comfortable, try a few famous difficult structures: Chicxulub, Sudbury, or Vredefort. They are important impact structures, but they are poor beginner examples because Google Earth does not necessarily give you a satisfying circle. Some are deeply eroded, partly buried, heavily modified, or too large to read from a normal viewing height.
This is where the Moon comparison helps set expectations. Earth’s active surface removes and disguises impact scars through weathering, tectonics, burial, and erosion, which is why the confirmed terrestrial count is tiny compared with the Moon’s visible crater record.[3] A barely visible structure is not a bad crater. It is a bad first lesson if the goal is to learn the software’s visual and measurement tools.
When a famous crater disappoints in Google Earth, use the KMZ placemark as an anchor and widen the question. Instead of asking, “Where is the perfect rim?” ask what remains visible at this scale: a partial arc, a drainage pattern, a ring of hills, a gravity- or geology-defined structure discussed in references, or nothing obvious in the satellite view. That answer is still useful if it keeps the distinction between confirmed geology and visible scenery clear.
A Practical Session Plan
A good first session takes less time than a tour of every famous crater and teaches more. Work through four sites in order: Barringer for the clean simple form, Wolfe Creek or Tenoumer for another desert rim, Tswaing or Pingualuit for a lake-filled structure, and Gosses Bluff for erosion. At each site, make one diameter measurement and one elevation profile. Save the path names clearly, such as “Barringer rim-to-rim profile,” so you can compare them later.
- If the crater looks obvious, measure it anyway.
- If the crater looks too perfect, check whether you are measuring a lake edge instead of a rim.
- If the crater looks messy, zoom out before deciding it has no structure.
- If the profile looks strange, redraw the path through the center and extend it beyond both rims.
- If a coordinate lands in empty-looking terrain, remember that it may mark the structure center rather than the most visible edge.
The habit matters more than any single crater name: start from confirmed data, observe the terrain, measure the structure, check the profile, and only then decide what the image is showing. Google Earth Pro is strong enough for serious beginner analysis when those tools work together. Treated as a satellite-image guessing game, it is mostly a way to become confident about the wrong circles.
References
- Measure distances and elevation, Google Earth Help.
- Impact Craters Map, Earth Impact Database, Western University.
- Where are all the impact craters on Earth?, National Air and Space Museum.
- List of impact structures on Earth, Wikipedia.
- How can I tell if I have found an impact crater?, U.S. Geological Survey.
Comments
Join the discussion with an anonymous comment.