
AMATEUR_ASTRONOMY Exam Hub
A Structured Approach to Learning Amateur Astronomy
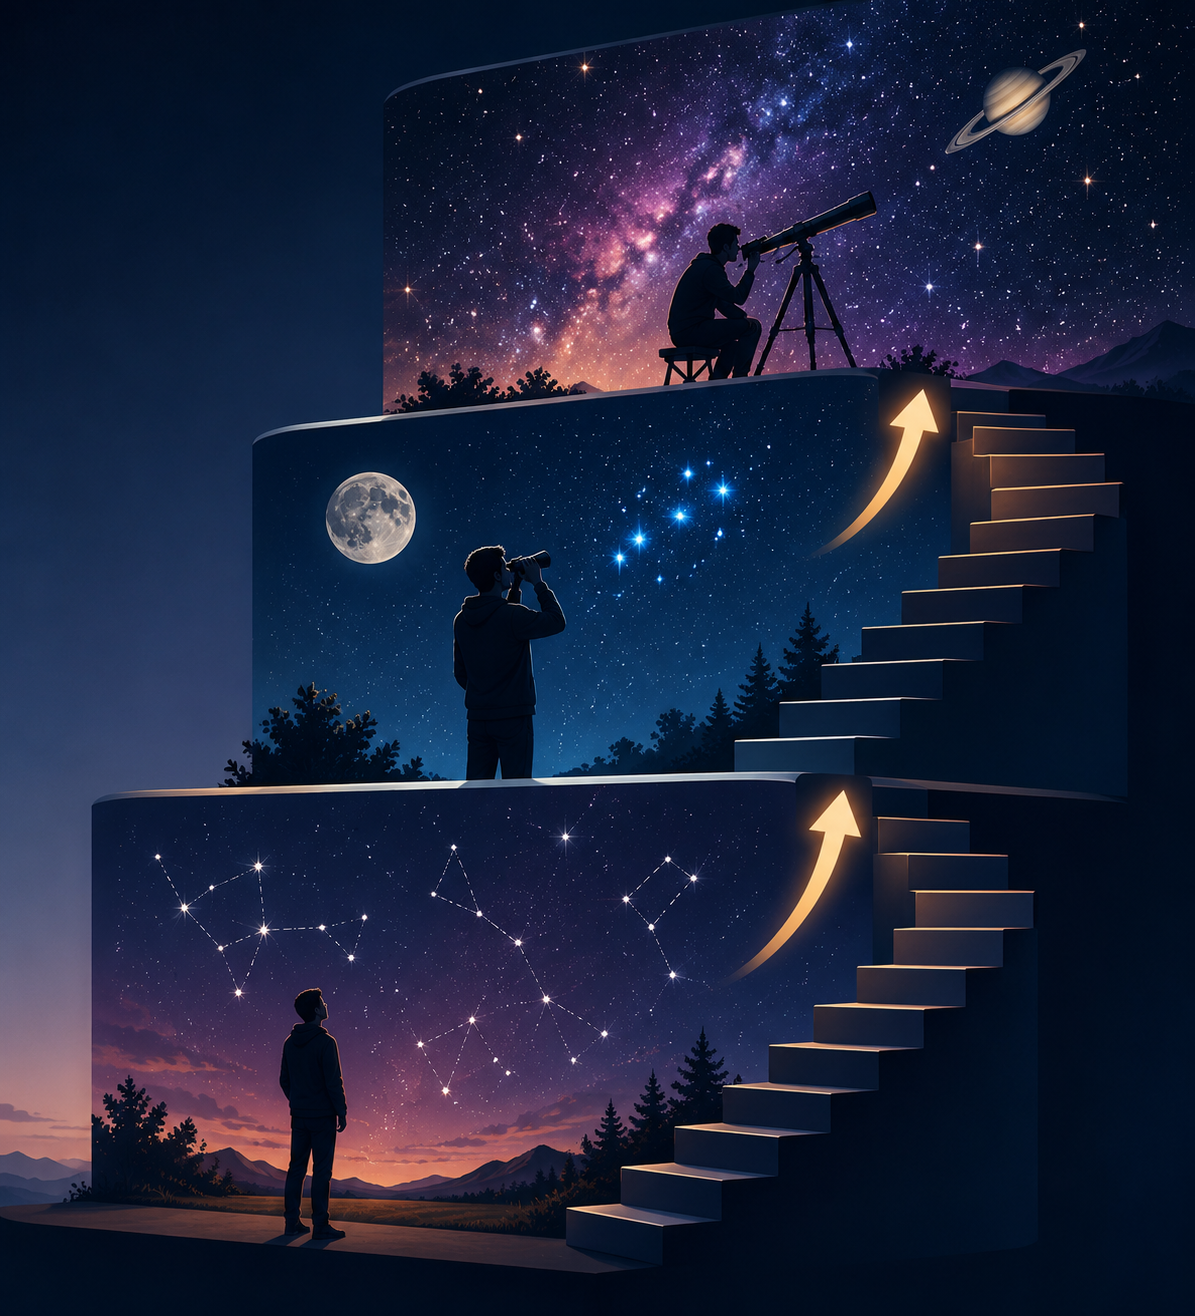
This article outlines a three-tier progression for amateur astronomy beginners—from naked-eye sky literacy through binoculars to telescopic observation—with milestone checkpoints to help you advance at your own pace without overspending on equipment.
- SAT
- ACT
- GRE
- MCAT
- ASVAB
- digital-sat
- adaptive-testing
- registration-fee
- content-outline
- score-target
If you are wondering whether to buy a telescope first, the useful answer is: not yet, unless you already know your way around the sky. The beginner path that holds up best is simpler and less expensive: learn the naked-eye sky, then use binoculars, then add a telescope when you can explain what the telescope will actually improve. Sky & Telescope, BBC Sky at Night, the Royal Astronomical Society, Space.com, and The Planetary Society all point beginners toward some version of that sequence rather than toward an immediate equipment purchase.[1][2][3][4][5]
That may sound slower than opening a box and aiming a tube at the Moon tonight. In practice, it is the faster route because it removes the main source of early frustration: standing outside with a device you cannot aim, under a sky you cannot read, expecting magnification to do the learning for you.
| Tier | Approximate practice window | Main work | Move on when you can |
|---|---|---|---|
| 1. Naked-eye sky literacy | About 4-8 weeks with regular weekly practice | Recognize anchor constellations, understand light pollution, protect dark adaptation, use magnitude and hand-angle estimates | Find several guidepost patterns without being rescued by an app |
| 2. Binocular exploration | About 4-8 weeks with regular weekly practice | Use 7x to 10x binoculars, scan star fields, locate bright clusters and lunar features, keep a simple observing log | Find targets first with your eyes, then place binoculars on them steadily |
| 3. Telescope readiness | About 4-8 weeks before buying, borrowing, or joining a club session | Learn what aperture, mount stability, eyepieces, and realistic magnification change | Explain why a telescope helps a specific target instead of expecting it to solve navigation |
Tier 1: Learn the sky before you magnify it
The first tier is not a warm-up. It is the part most beginners skip and then quietly need later. Naked-eye astronomy teaches the basic map: where north is, how the sky appears to rotate, which patterns stay useful across seasons, why a bright planet may not twinkle like a star, and how much your local sky limits what you should expect to see.
Start with your actual sky, not with a photograph from a desert observatory. The Bortle scale runs from Class 1, the darkest skies, to Class 9, inner-city skies. The Planetary Society recommends using Clear Outside as a free way to look up local conditions, and it notes that even Class 9 skies still leave beginners with the Moon, bright planets, and several constellations.[5] That matters because disappointment often comes from comparing a real urban sky to an image made under conditions you do not have.
For the first few sessions, do not try to learn the whole sky. Pick a small number of anchor patterns. In mid-northern latitudes, common beginner guideposts include the Big Dipper, Cassiopeia, Polaris, Orion, the Summer Triangle, and the Great Square of Pegasus. That list has a northern-hemisphere bias; southern-hemisphere observers need different anchors and different seasonal timing. The skill is not memorizing those exact names. The skill is learning a few dependable shapes well enough that the rest of the sky has reference points.
Your first month of practice should be small and repeatable
A useful weekly session can be plain: go outside, give your eyes time, identify two or three patterns, check them against a chart or app, and write down what you saw. The log does not need poetry. Date, time, location, sky conditions, objects attempted, objects found, and one note about difficulty are enough. If you keep doing that, the sky stops being a random ceiling and starts becoming a place with routes.
- Session 1: Find the Moon if visible, then identify one bright planet or one major constellation.
- Session 2: Return to the same place and find the same pattern without opening an app first.
- Session 3: Add one neighboring pattern and sketch the rough spacing between them.
- Session 4: Use a chart only after making your own first attempt, then correct your map.
This is where study technique helps. You are doing retrieval practice, not sightseeing. Looking up the answer first feels efficient, but it trains dependency. Trying to locate Orion or Cassiopeia from memory, then checking yourself, builds the same kind of durable recall that works in other learning plans. If you want the broader study-method version of that idea, StudyMethod's methods library covers the same principle in academic contexts.
Protect dark adaptation like it is part of the instrument
Your eyes are equipment. Dark adaptation takes about 20-30 minutes, and a single glance at a bright phone screen can reset it.[2][4][6] That one fact changes beginner behavior more than almost any gear tip. If you walk outside, look up for two minutes, check your messages, and then complain that the sky is empty, you have not yet given your eyes a fair trial.
Use a red-light setting if your app has one, dim the screen as far as practical, and look at the chart only when you need to. Better yet, preview the evening indoors: choose one or two targets, note their relationship to a known anchor, then put the phone away for the first part of the session. The goal is not to ban technology. The goal is to keep the tool from erasing the very sensitivity you came outside to use.
Learn magnitude without letting the scale fool you
Magnitude is one of the first astronomy terms that sounds backward because smaller numbers mean brighter objects. BBC Sky at Night explains that a 1st-magnitude star is about 2.5 times brighter than a 2nd-magnitude star, and Sirius at magnitude -1.5 is roughly 100 times brighter than a 6th-magnitude star, which is near the naked-eye limit under good conditions.[2]
You do not need to calculate brightness ratios in the yard. You do need the practical lesson: when a chart says an object is magnitude 6, that does not mean it is just a little dimmer than a bright star. It may be entirely unreasonable from a bright neighborhood, especially before your eyes adapt. Magnitude teaches patience and target selection.
Use your hand as a measuring tool
Charts and apps use angles because the sky is a dome from your point of view. A fist held at arm's length covers about 10 degrees of sky.[2] Once you know that, instructions such as “look 20 degrees east” become usable. Two fist-widths is not exact surveying, but it is good enough to move from one bright pattern toward another without waving a telescope around blindly.
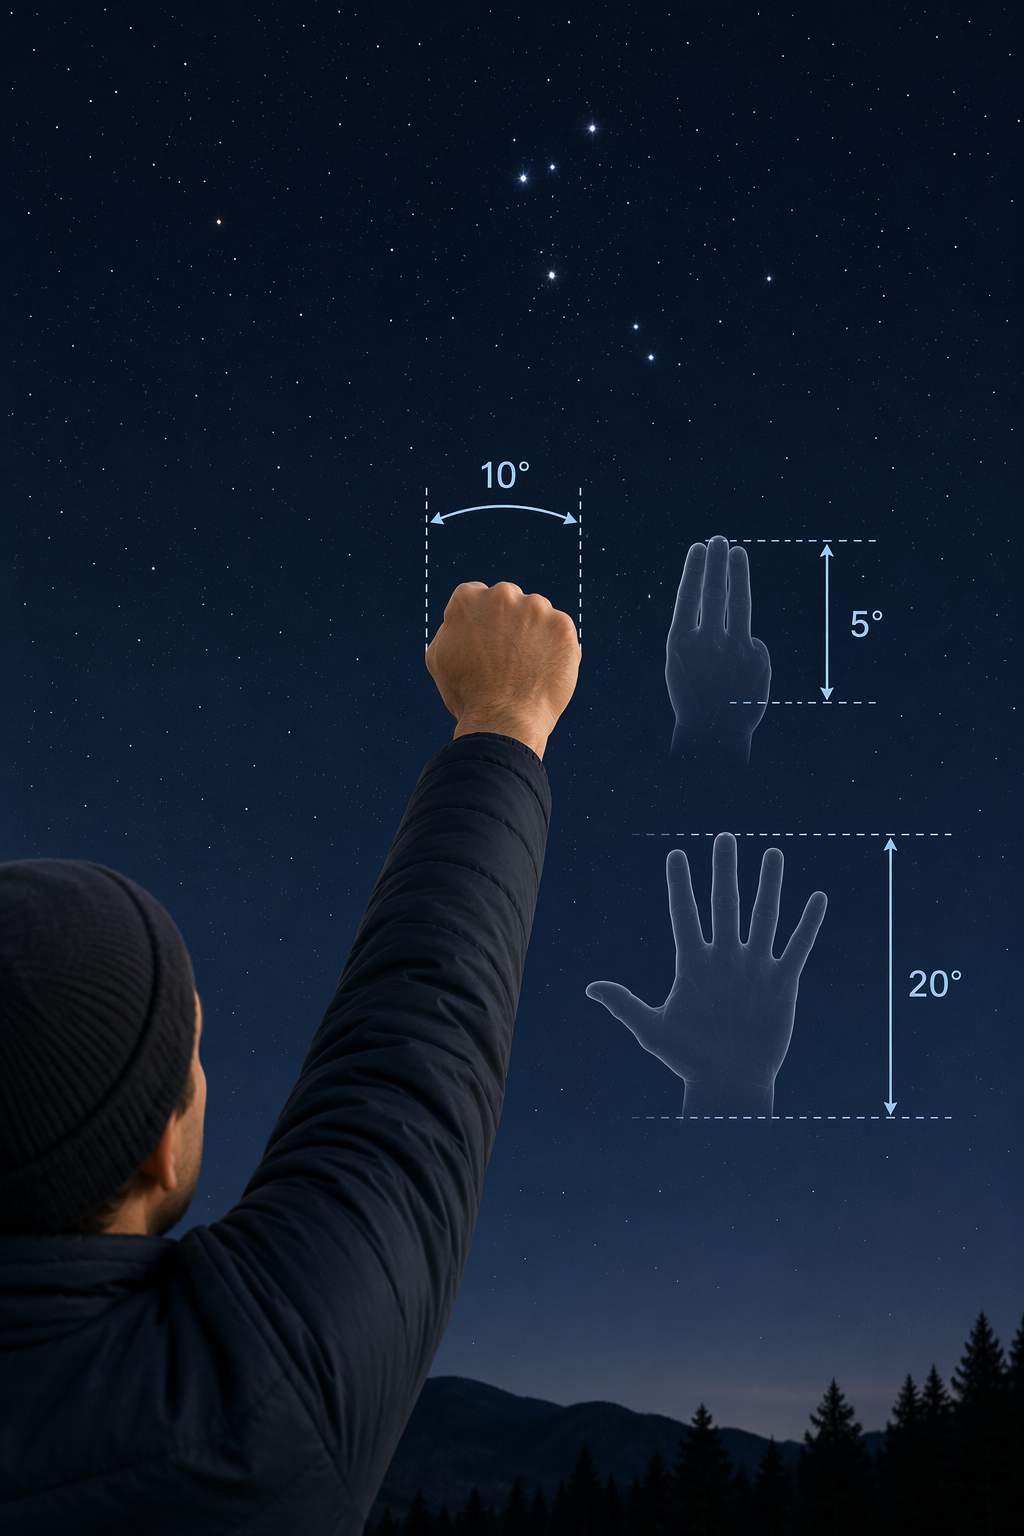
Practice this even when clouds interrupt observing. Estimate the distance between two bright stars, check a chart, and see whether your estimate was close. That small habit pays off later when you use binoculars and again when you aim a telescope finder.
Naked-eye checkpoint
Stay in Tier 1 until you can do most of the following without someone standing next to you giving corrections:
- Name your local light-pollution situation in plain terms and choose targets that fit it.
- Wait through dark adaptation without repeatedly checking a bright screen.
- Find at least several anchor constellations or seasonal guideposts for your hemisphere.
- Use fist-width estimates to move around the sky.
- Read a basic chart or app and then look away from it long enough to navigate.
- Keep a short observing log for multiple sessions.
Tier 2: Make binoculars your first real instrument
Binoculars are not a consolation prize for people who cannot afford a telescope. They are the right first instrument for many beginners because they preserve the connection between the sky you know and the magnified view you are trying to interpret. Sky & Telescope notes that ordinary 7x to 10x binoculars improve on the naked-eye view about as much as a good amateur telescope improves on binoculars, at less than half the price.[1]
The important part is not only cost. Binoculars have a wider field of view than most telescopes, so they are more forgiving when your aim is imperfect. They also show both eyes a natural-looking view, which helps beginners connect what they learned in Tier 1 to what appears in the glass.
A good binocular session starts naked-eye. Find the anchor pattern first. Point your face at the target area. Raise the binoculars without changing your head position. If the view jumps somewhere else, lower them and try again. That little movement is a skill. It is also the same kind of pointing discipline you will need later with a finder scope.
What to observe with binoculars
Choose targets that reward a wide field. The Moon is obvious, but do not make it your only target. Bright star clusters, dense Milky Way fields where visible, and easy double-star or asterism regions all teach you to compare chart patterns with real views. If you are under urban skies, the list is shorter, but not empty. The Moon, bright planets, and the brightest star patterns still give you useful practice.
This is also a good stage to plan around a specific sky event. A meteor shower, for example, is mainly a naked-eye event, but preparing for one teaches sky direction, timing, patience, and realistic expectations. StudyMethod's Perseid meteor shower student guide for 2026 is useful for that kind of focused observing plan.
Do not turn Tier 2 into a shopping project. If you already own ordinary binoculars, start there. Learn whether you can hold them steady, whether you can find the same patch of sky twice, and whether you can describe what changed from naked-eye view to binocular view. Those answers are more important than a specification sheet at this stage.
A simple binocular routine
- Pick one or two targets before going outside.
- Find the nearest naked-eye anchor first.
- Use hand angles to move from the anchor toward the target area.
- Raise the binoculars while keeping your head aimed at the same place.
- Compare the view with a chart only after you have made an attempt.
- Log what you found, what you missed, and what you will try next time.
The log becomes more useful in Tier 2 because binocular views contain more stars than your unaided eyes show. That can be exciting for about ten seconds and then confusing. Sketching a small triangle of stars, noting “brighter star at left edge,” or writing “target probably too low over neighbor's roof” gives your next session a starting point instead of another blank attempt.
Binocular checkpoint
You are ready to think seriously about a telescope when binocular observing feels like a controlled act rather than a lucky catch. Look for these signs:
- You can find a target area naked-eye before lifting binoculars.
- You can hold the view steady enough to inspect it, or you know when you need support.
- You can match a binocular star field to a simple chart.
- You understand that some objects are unavailable from your site or season.
- You can name what binoculars add: more stars, wider scanning, lunar detail, and brighter views of suitable targets.
Tier 3: Add a telescope only when you know what problem it solves
A telescope is a fine instrument. It is just a poor substitute for sky literacy. When beginners buy one too early, they often discover that magnification makes the aiming problem harder. The field is narrower, the image may be inverted or mirrored depending on the setup, and a shaky mount can turn a bright planet into a trembling dot.
The most misleading number on many beginner telescope boxes is magnification. The Royal Astronomical Society warns that inexpensive telescopes from non-specialist outlets are often of poor optical quality, and department-store scopes advertised around claims such as “300x” should be treated with suspicion. For many celestial sights, 75x magnification is enough; aperture matters more because it controls how much light the telescope gathers.[3]
That distinction changes the buying question. Do not ask, “How powerful is it?” Ask: how much aperture does it have, how stable is the mount, how easy is it to aim, what eyepieces are included, and what targets am I actually trying to observe? A modest, stable telescope used by someone who can navigate will outperform an impressive-looking tube that spends the evening pointed almost, but not quite, at the target.
Borrowing may teach more than buying
Before purchasing, try a public star night, an astronomy club, a library telescope program if your area has one, or a borrowed scope from someone willing to show you the setup. Watch the whole process, not just the view through the eyepiece. Notice who levels the mount, aligns the finder, chooses the eyepiece, focuses, tracks the target, and explains why the object looks smaller or fainter than expected.
That setup labor is not a nuisance around astronomy. It is astronomy. A beginner who learns it gradually is much less likely to blame the sky, the telescope, or themselves after one awkward evening.
Telescope readiness checkpoint
You are not waiting for perfection. You are waiting for enough competence that the telescope adds precision instead of confusion. Before buying one, you should be able to say yes to most of these:
- I can find several sky anchors from my usual observing location.
- I know what my light pollution allows and which targets are unrealistic from home.
- I can use binoculars to locate target areas without constant app dependence.
- I understand that aperture, mount stability, and optical quality matter more than a large magnification claim.
- I can name three objects I want a telescope for and explain what the telescope should improve for each one.
- I am willing to spend part of each session aligning, focusing, tracking, and logging rather than only looking.
How to pace the three tiers without turning them into homework
The 4-8 week ranges in this plan are deliberately approximate. They are a practical synthesis from beginner guidance that emphasizes repeated observing, chart use, and gradual equipment progression, not a measured guarantee from a single study.[1][2][4][5] Weather, latitude, work schedules, mobility, local lighting, and season all change the pace.
A better measure is whether you can perform the next task without being rescued. If you still cannot find a guidepost constellation, more magnification will not fix that. If you cannot keep binoculars on a target area, a narrow telescope field will punish the same weakness. If you cannot explain what aperture changes, a box promising extreme magnification is more likely to waste your money than deepen your observing.
Use the same rhythm across tiers: preview, observe, retrieve, check, log. Preview the target before the session. Observe without immediately outsourcing the task to an app. Retrieve from memory where the pattern should be. Check yourself against a reliable chart. Log the result. That rhythm is modest, but it turns scattered nights outside into cumulative learning.
| If this is happening | Stay with this tier | Practice next |
|---|---|---|
| You keep losing orientation after opening an app | Naked-eye | Choose one anchor pattern and find it first without the screen |
| You can identify constellations but cannot place binoculars on them | Binocular | Aim with your eyes first, then raise binoculars without shifting your head |
| You want a telescope mainly because binoculars feel unimpressive | Binocular | Observe brighter, wider targets and compare notes across sessions |
| You can find targets but want more lunar, planetary, or deep-sky detail | Telescope readiness | Borrow or test a stable telescope and learn the setup sequence |
The point of the sequence is not to keep beginners away from telescopes. It is to make the first telescope night worth having. If you can navigate the sky, observe patiently with binoculars, protect your night vision, and explain what a telescope will add rather than magically solve, you are ready to buy or borrow one without letting the box do the thinking for you.
References
- Astronomy for Beginners: How to Get Started in Backyard Astronomy, Sky & Telescope
- Astronomy for beginners, BBC Sky at Night Magazine
- Getting started in Astronomy, Royal Astronomical Society
- Expert advice for new stargazers: How to begin your amateur astronomy journey, Space.com
- Astronomy for Beginners, The Planetary Society
- Getting started in astronomy, Canadian Space Agency
Related exhibits & inventory
Verified outcomes
No verified outcomes on file for this exam yet
See Methodology for how outcome evidence is disclosed once logged.
Planners
No planner filed for this exam yet
A downloadable timeline template for this exam hasn't been published yet.
Tool verdicts
AI-tool cautions
No AI tools tested for this exam yet
No hands-on AI-accuracy logs have been filed for this exam.
Questions about this plan
Ask a question about a specific section, timeline, or citation in this plan — or flag something that needs correcting.
Comments
Join the discussion with an anonymous comment.